Example 2: 会話ダイアログを作る
以下のような登場人物による会話シーンを作成します。少しずつ DSL の構文を追加しながら作成していく過程を一緒に体験してみましょう。
シーンを作成する
Dialogue という名前で Conrol ノードのシーンを作成して、以下のようなツリーになるよう子ノードを追加します。
Content, Button は固有名でアクセスできるようにします。
Dialogue <Control ノード>
  ├ ColorRect
  ├ Content <RichTextLabel ノード>
  └ Button
ColorRect がダイアログの枠になるようサイズを調整して、Content を配置します。そして、枠の下に Button を置きます。
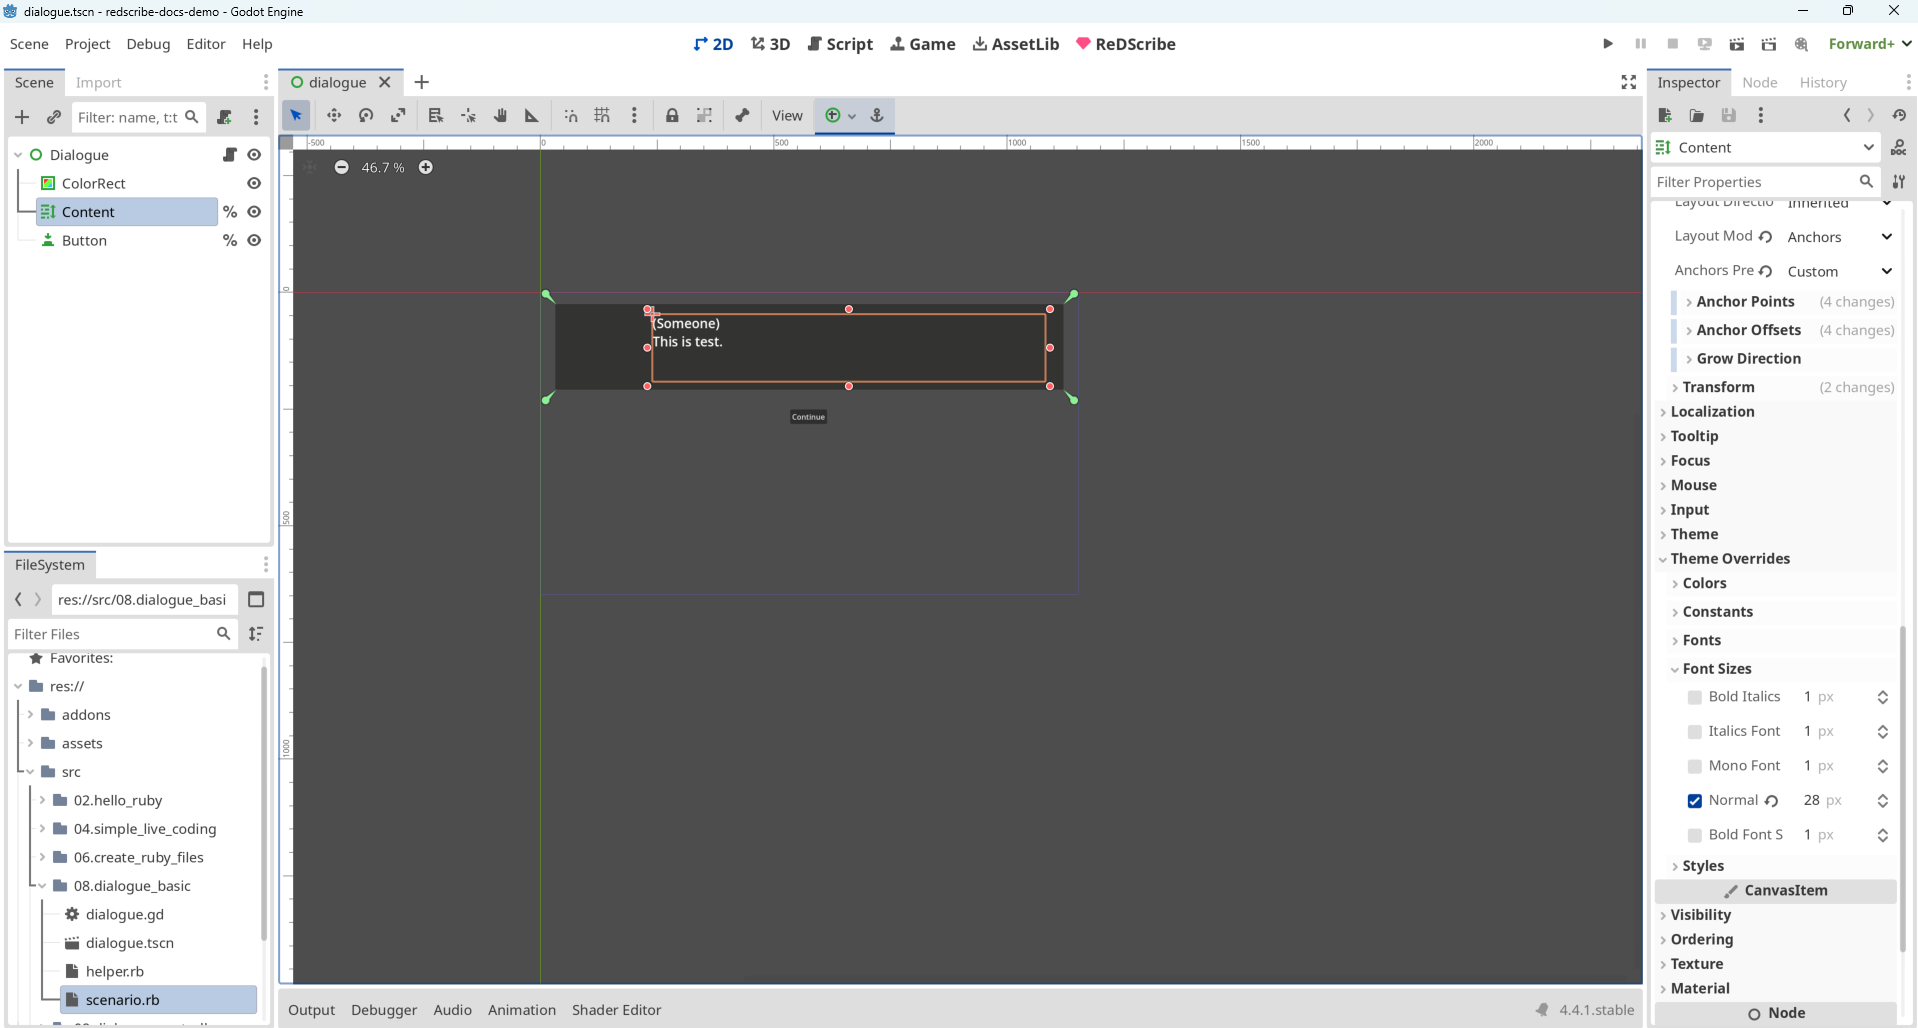
文字が小さい場合は、インスペクタから Font Size を調整してみてください。
DSL を考える
作成したシーンの Content に会話内容を表示する DSL を考えてみます。
なるべくプレーンテキストのような読み書きしやすさを備えているのが望ましいです。
読み書きしやすさを求める
声に出して読める文章を書きたいので、(登場人物) says "(発言)" のような形で書けるようにしたいと思います。
どのように定義するのがよいでしょうか。
メソッドで定義する場合
まずは、シンプルにメソッドのキーワード引数として定義する場合を考えてみます。
Alice says: "I love Ruby."
とてもシンプルで、1行で書ける簡潔さと美しさがあります。
しかし、この方法で書き続けると、登場人物の名前の長さによって says の位置が揃わず少し読みづらさがあります。
また、同じ人物が続けて発言する場合に冗長さを感じます。
Alice says: "I love Ruby."
Benjamin says: "I love Ruby too."
Benjamin says: "I also love Godot."
ブロックで定義する場合
次は、ブロックを使う方法を考えてみます。
登場人物名の後に改行が入るため、says の位置は揃っています。
また、同じ人物が続けて発言した際の冗長さもありません。
Alice do
  says "I love Ruby."
end

Benjamin do
  says "I love Ruby too."
  says "I also love Godot."
end
しかし、end のために追加される1行が気になります。
今回作りたいのは、登場人物による発言を上から流れるように読み書きできる DSL なので、余計な行は省略したいです。
const_missing を使う場合
上記のコードから end を削除して動かせないでしょうか。少し考えましたが、以下の形で動かせそうです。
Alice;
  says "I love Ruby."

Benjamin;
  says "I love Ruby too."
  says "I also love Godot."
登場人物を、メソッドではなく定数として判断させて const_missing によるメタプログラミングを使えば、余分な end の一行を省けそうです。
DSL を実行するためのヘルパーを作成する
上記の DSL を動かすためのコードを書いてみます。helper.rb ファイルとして作成したシーンと同じディレクトリに保存しましょう。
ちょっといろんなメタプログラミングを使ってしまいましたが、すべては理想の DSL を動かすためです。
# = Redirects method calls to Xxx.current
#
#   `delegate Foo, :bar` means calling `bar` will forward to `Foo.current.bar`
#
def delegate(const, *keys)
  keys.each do |key|
    define_method(key) do |*args|
      const.current.send(key, *args)
    end
  end
end


class Dialogue
  class << self
    attr_accessor :current
  end

  attr_accessor :fiber

  def initialize(&block)
    self.fiber = Fiber.new do
      yield
      Godot.emit_signal :finished, true
    end
    Dialogue.current = self
  end

  def continue(val = nil)
    fiber.resume(val)
  end

  def listen!
    Fiber.yield
  end
end
delegate Dialogue, :continue #


class Speaker
  class << self
    attr_accessor :all, :current
  end
  self.all = []

  attr_accessor :name

  def initialize(name)
    self.name = name
    Speaker.all << self
  end

  def says(str)
    emit :says, { content: str }
    Dialogue.current.listen!
  end

  private
    def emit(key, args = {})
      Godot.emit_signal key, { name: name, **args }
    end
end
delegate Speaker, :says #


# = const_missing
#
#   `Alice;` sets `Speaker.current` to the Speaker instance named "Alice"
#
def Object.const_missing(name)
  speaker = Speaker.all.find{|s| s.name == name.to_s }
  if speaker
    Speaker.current = speaker
  else
    super
  end
end


def speakers(names)
  names.each{|name| Speaker.new(name) }
end
ファイルを保存したら、REPL で実行してみましょう。
require 'path/to/helper' には、先ほど作成したファイルのパスを指定する必要がありますが、書くのが面倒な場合はファイルシステム上の Ruby ファイルを REPL の入力欄にドラッグ・アンド・ドロップしましょう。
require 'path/to/helper' が自動挿入されたと思います。この動作は、REPL だけではなく、エディタでも利用できます。
require 'path/to/helper'

Dialogue.new do
  speakers %w(Narrator WhiteRabbit Alice)

  Narrator;
    says "One sunny afternoon,"
    says "Alice met the White Rabbit"

  Alice;
    says "Hi! I'm Alice. I'm curious!"

  WhiteRabbit;
    says "Hi, I'm late. I'm busy."
end
=> "#<Dialogue:0x177babf47d0 @fiber=#<Fiber:0x177babf46e0 (created)>>"
エラーなく Fiber が作成できました。
続けて、以下を実行します。
continue
[ says ] signal emitted: { &"name": "Narrator", &"content": "One sunny afternoon," }
=> <null>
says をキーにしたシグナルが発行されました。
name に対する content も正しく設定されています。うまく動いてそうです。
さらに続けて continue を4回実行します。
[ says ] signal emitted: { &"name": "Narrator", &"content": "Alice met the White Rabbit" }
=> <null>

[ says ] signal emitted: { &"name": "Alice", &"content": "Hi! I\'m Alice. I\'m curious!" }
=> <null>

[ says ] signal emitted: { &"name": "WhiteRabbit", &"content": "Hi, I\'m late. I\'m busy." }
=> <null>

[ finished ] signal emitted: true
=> true
それぞれ name に対して期待した content が設定されています。
最後は、すべてが終了したことを検知するための finished をキーにしたシグナルが発行されたことを確認できました。
では、終了したのに続けて、continue を呼ぶとどうなるでしょうか? 答えはエラーになります。
Error: resuming dead fiber (FiberError)
Fiber 自身は終了したかどうかを状態として持っています。
Dialogue.current.fiber

Dialogue.current.fiber.alive?
=> "#<Fiber:0x177babf46e0 (terminated)>"

=> false
Fiber を使う際は、上記を使ってうまくハンドリングするか、今回の例のように Fiber.new do ... end の最後にシグナルを発行するようにして、エラーを回避しましょう。
GDScript をアタッチする
DSL の文法と、そこから発行されるシグナルの形は決まったので、Dialogue シーンの処理を書いてみましょう。
以下のような GDScript をシーンにアタッチします。
extends Control

@export var controller : ReDScribe


func _ready() -> void:
	controller.channel.connect(_handle)
	%Button.pressed.connect(continue_dialogue)
	clear()


func speak(speaker: String, content: String) -> void:
	%Content.text = "(%s)\n%s" % [speaker, content]


func continue_dialogue() -> void:
	controller.perform('continue')


func clear(all: bool = false) -> void:
	%Content.text = ''
	if all: %Button.hide()


func _handle(key: StringName, payload: Variant) -> void:
	match key:
		&'says': speak(payload['name'], payload['content'])
		&'finished': clear(true)
		_: print_debug('[%s] %s', [key, payload])
シナリオを作成する(Ver. 1)
準備は整いました。会話内容を書いて scenario.rb として保存してみましょう。
これがプログラミング言語で書かれているとは思わないかもしれませんが、これが動くのが Ruby の柔軟性です。
require 'path/to/helper'
Dialogue.new do
  speakers %w(Narrator WhiteRabbit Alice)

  Narrator;
    says "Alice is resting in the field."
    says "Suddenly, she hears a panicked voice from afar."

  WhiteRabbit;
    says "I'm late, I'm late, I'm late!"

  Alice;
    says "Hi! Where are you going?"

  WhiteRabbit;
    says "I'm late, I'm late, for a very important date!"

  Alice;
    says "Wait!"
end
インスペクタの Controller プロパティを押下して、新規 ReDScribe を選択します。
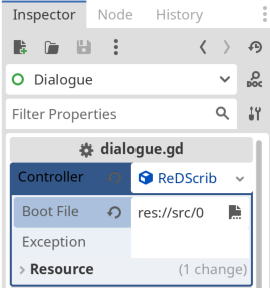
Boot File に作成した scenario.rb を設定して、シーンを実行します。
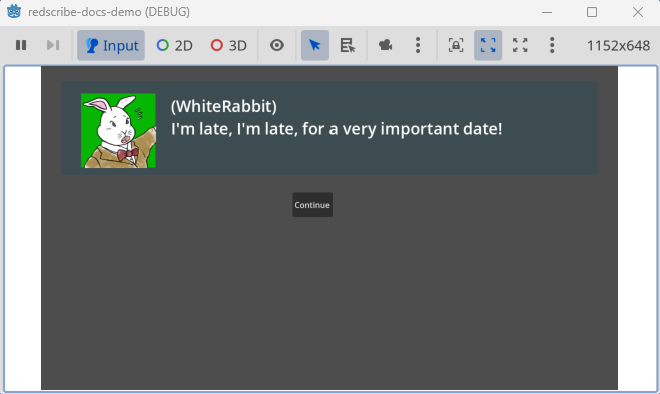
以下の動画のように会話ダイアログが表示されましたか?
難しかった場合は、今回作成したデモプロジェクトは下記の GitHub リポジトリに置いているので、確認してみてください。 https://github.com/tkmfujise/redscribe-docs-demo/tree/main/src/08.dialogue_basic
キャラクターの表情を制御する
会話ダイアログの基礎部分は作成できました。次は、会話ダイアログに顔グラフィックを表示しようと思います。
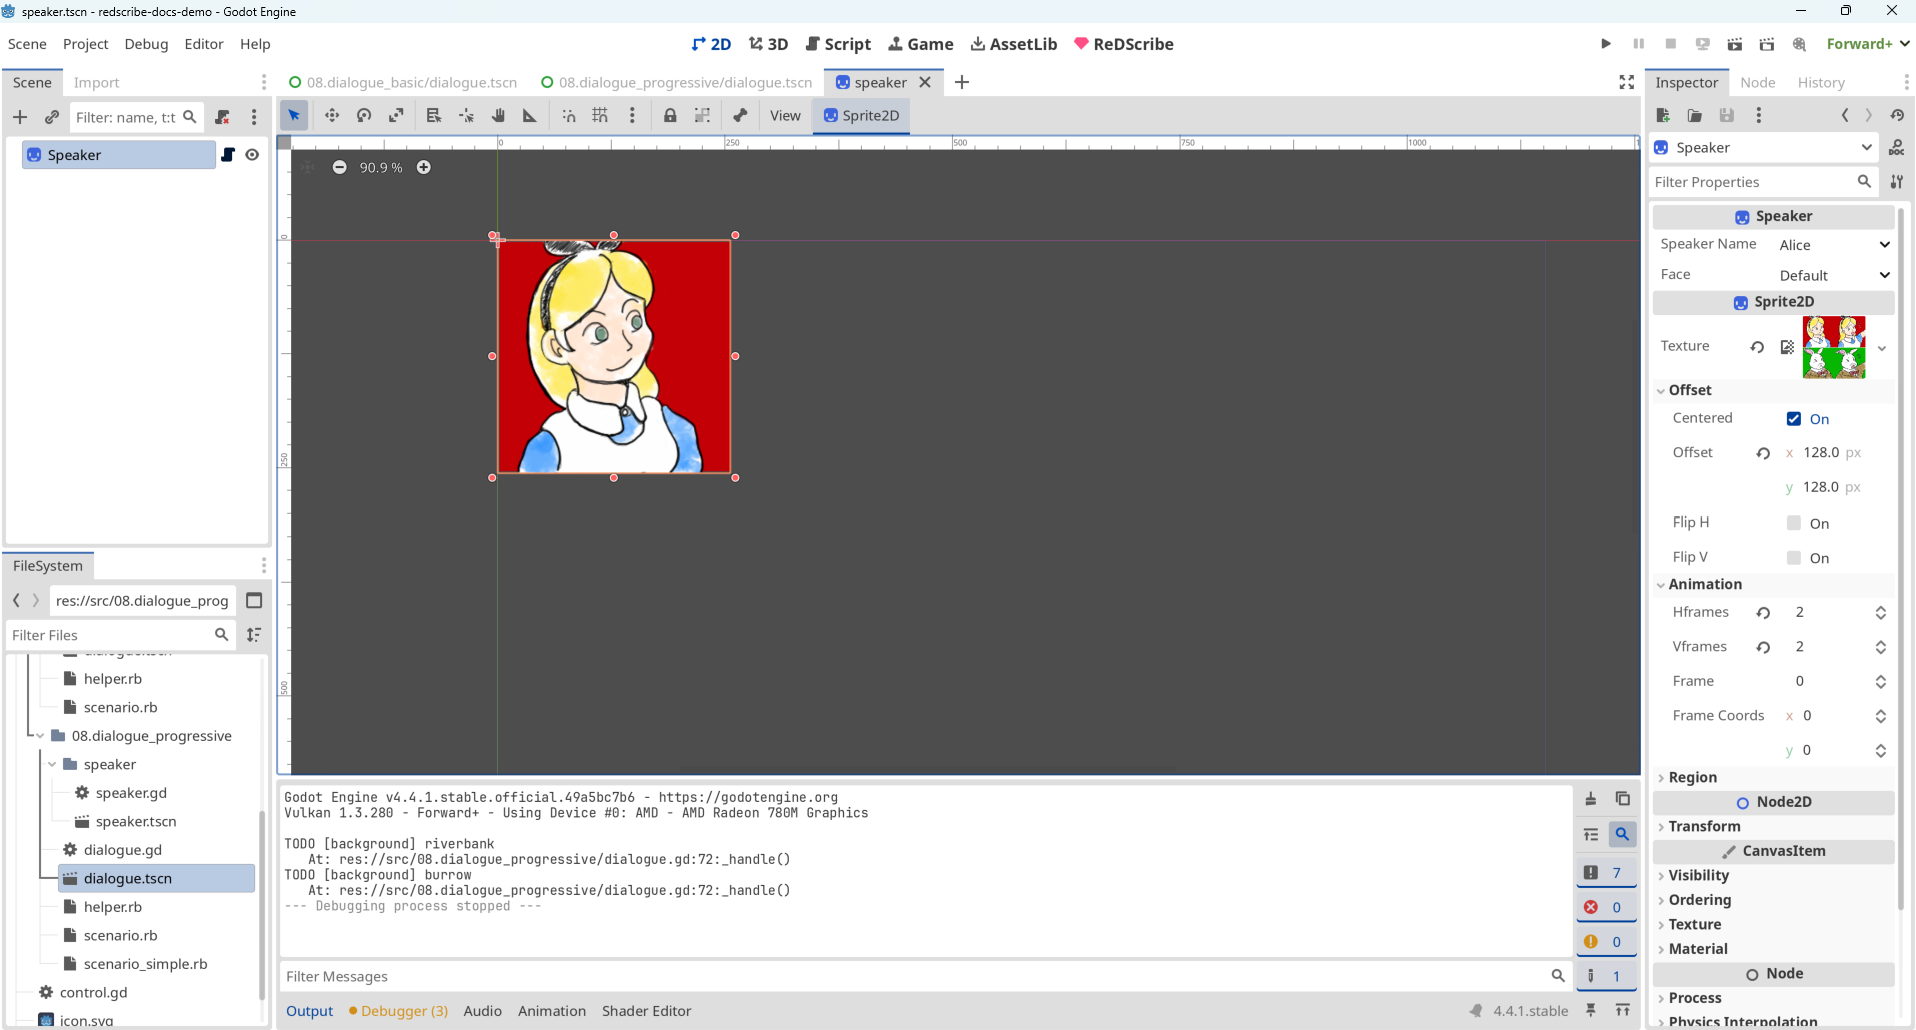
Speaker シーンを作成する
顔グラフィック用のシーンを新たに Speaker という名前で作成します。
Sprite2D ノードのシーンを作成して、通常の表情と、慌てた表情が描かれた 2x2 のタイル状の画像をセットします。 (サンプルと同じ画像を使いたい場合は ここからダウンロード できます。)
HFrames と VFrames には、"2" を設定します。
Frame Coords を操作することで、人物と表情を制御する仕組みにしようと思います。
extends Sprite2D
class_name Speaker

enum Name { Alice, WhiteRabbit }
enum Face { DEFAULT, FLUSTERED }

@export var speaker_name : Name : set = set_speaker
@export var face : Face : set = set_face


func set_speaker(val: int) -> void:
	frame_coords.y = val
	speaker_name = val as Name


func set_face(val: int) -> void:
	frame_coords.x = val
	face = val as Face
Dialogue シーンに追加する
Speaker シーンを Dialogue シーンに追加して、枠内に配置します。
Speaker は固有名でアクセスできるようにしておきましょう。

GDScript を修正する前に、DSL をどのように変更するか考えます。
シナリオを修正する(Ver. 2)
DSL に表情を制御するための構文を追加します。
以下のように、顔グラフィックの表情を一時的に変えるメソッドと、永続的に変えるメソッドのそれぞれを定義することで対応しようと思います。
Someone; with :some_faceでは、次の人物が発言するまで、その表情にする。Someone; got :some_faceでは、次の表情が設定されるまで、永続的に表情を変える。
require 'path/to/helper'
Dialogue.new do
  speakers %w(Narrator WhiteRabbit Alice)

  Narrator;
    says "Alice is resting in the field."
    says "Suddenly, she hears a panicked voice from afar."

  WhiteRabbit; got :flustered
    says "I'm late, I'm late, I'm late!"

  Alice;
    says "Hi! Where are you going?"

  WhiteRabbit;
    says "I'm late, I'm late, for a very important date!"

  Alice; with :flustered
    says "Wait!"
end
with と got を呼べるようにして、シグナルに face を含むよう修正します。
class Speaker
  class << self
    attr_accessor :all, :current

    def current=(speaker)
      current.temporary_face = nil if current
      @current = speaker
    end
  end
  self.all = []

  attr_accessor :name, :temporary_face, :permanent_face

  def initialize(name)
    self.name = name
    self.permanent_face = ''
    Speaker.all << self
  end

  def says(str)
    emit :says, { content: str }
  end

  def with(face)
    self.permanent_face = ''
    self.temporary_face = face.to_s
  end

  def got(face)
    self.permanent_face = face.to_s
  end

  def face
    temporary_face || permanent_face
  end

  private
    def emit(key, args = {})
      Godot.emit_signal key, { name: name, face: face, **args }
    end
end
delegate Speaker, :says, :with, :got #
GDScript を修正する
DSL の文法と、そこから発行されるシグナルの形は決まったので、Dialogue シーンの処理を修正しましょう。
speak メソッドで顔グラフィックを変更するようにします。
func speak(speaker: String, content: String, face: String) -> void:
	%Content.text = "(%s)\n%s" % [speaker, content]
	set_speaker(speaker)
	set_face(face)


func set_speaker(speaker: String) -> void:
	%Speaker.show()
	match speaker:
		'Alice':       %Speaker.speaker_name = Speaker.Name.Alice
		'WhiteRabbit': %Speaker.speaker_name = Speaker.Name.WhiteRabbit
		_: %Speaker.hide()


func set_face(face: String) -> void:
	match face:
		'flustered': %Speaker.face = Speaker.Face.FLUSTERED
		_: %Speaker.face = Speaker.Face.DEFAULT


func clear(all: bool = false) -> void:
	%Speaker.hide()
	%Content.text = ''
	if all: %Buttons.hide()


func _handle(key: StringName, payload: Variant) -> void:
	match key:
		&'says':
			speak(payload['name'], payload['content'], payload['face'])
		&'finished': clear(true)
		_: print_debug('[%s] %s', [key, payload])
実行してみましょう。顔グラフィックが切り替わったら成功です。
選択肢を表示する
会話の途中に選択肢を表示できるようにしてみましょう。
シナリオを修正する(Ver. 3)
DSL に選択肢を表示するための構文を追加しようと思います。
以下のように、選択肢を表示するメソッドと、選択された値を取得するメソッドを定義することで対応しようと思います。
asks "(発言)"では、発言を表示しつつ選択肢も表示するようにする。___?で、選択された値を取得できるようにする。
require 'path/to/helper'
Dialogue.new do
  speakers %w(Narrator WhiteRabbit Alice)

  Narrator;
    says "Alice is resting in the field."
    says "Suddenly, she hears a panicked voice from afar."

  WhiteRabbit; got :flustered
    says "I'm late, I'm late, I'm late!"

  Alice;
    says "Hi! Where are you going?"

  WhiteRabbit;
    says "I'm late, I'm late, for a very important date!"

  Alice; with :flustered
    says "Wait!"

  Narrator;
    says "Alice chased after the rabbit."
    says "But the rabbit disappeared into a burrow."

  Alice;
    says "He went in here."
    asks "Should I go in too?"
    unless ___?
      says "It looks so narrow and grimy... I really shouldn't."
      until ___?
        says "But I just can't stop wondering."
        asks "Maybe I should go in after all?"
      end
    end
    says "Alright, here goes!"

  Narrator;
    says "As Alice entered the burrow, the ground gave away and she fell down."
end
どうでしょう。感じ方は人それぞれでしょうが、says と asks という短い単語を使い分ける軽快さと、___? で穴埋め構文のように書けるのが私には気持ちよいです。
asks と ___? を呼べるようにして、シグナルに choices を含むよう修正します。
class Dialogue
  class << self
    attr_accessor :current
  end

  attr_accessor :fiber, :last_value

  def initialize(&block)
    self.fiber = Fiber.new do
      yield
      Godot.emit_signal :finished, true
    end
    Dialogue.current = self
  end

  def continue(val = nil)
    fiber.resume(val)
  end

  def listen!
    self.last_value = Fiber.yield
  end

  def ___?
    last_value
  end
end
delegate Dialogue, :continue, :___? #


class Speaker
  class << self
    attr_accessor :all, :current

    def current=(speaker)
      current.temporary_face = nil if current
      @current = speaker
    end
  end
  self.all = []

  attr_accessor :name, :temporary_face, :permanent_face

  def initialize(name)
    self.name = name
    self.permanent_face = ''
    Speaker.all << self
  end

  def says(str)
    communicate :says, str
  end

  def asks(str, choices = { 'Yes' => true, 'No' => false })
    communicate :asks, str, choices
  end

  def with(face)
    self.permanent_face = ''
    self.temporary_face = face.to_s
  end

  def got(face)
    self.permanent_face = face.to_s
  end

  def face
    temporary_face || permanent_face
  end

  private
    def emit(key, args = {})
      Godot.emit_signal key, { name: name, face: face, **args }
    end

    def communicate(key, str, choices = {})
      emit key, { content: str, choices: choices }
      Dialogue.current.listen!
    end
end
delegate Speaker, :says, :asks, :with, :got #
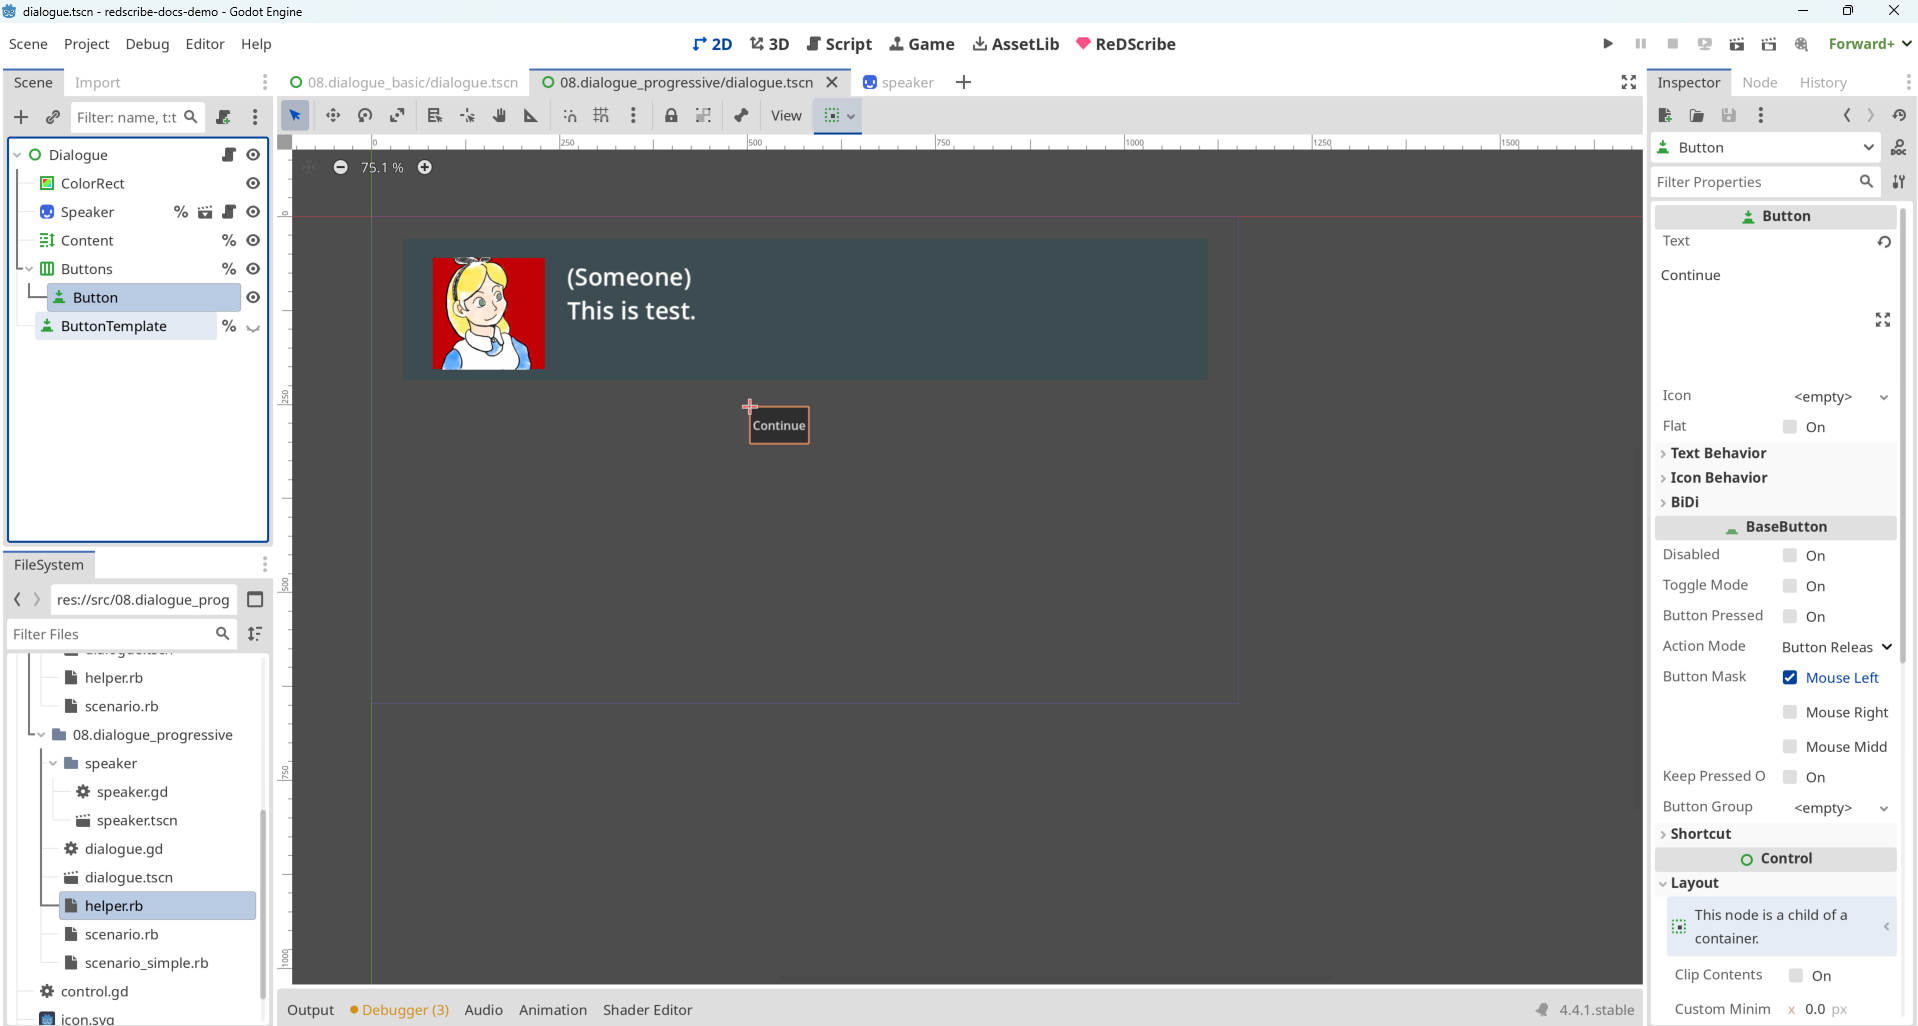
Dialogue シーンを修正する
元の Button ノードは ButtonTemplate にリネームして、非表示にします。
新たに Buttons という名前で HBoxContainer ノードを作成して、見た目の調整用に子ノードに Button を1つ追加しておきます。
Dialogue <Control ノード>
  ├ ColorRect
  ├ Speaker <Speaker シーン>
  ├ Content <RichTextLabel ノード>
  ├ Buttons <HBoxContainer ノード>
  │  └ Button
  └ ButtonTemplate
GDScript を修正する
says と asks のシグナルが発行された際に、選択肢を自動生成するように修正します。
そのために、set_choices メソッドで ButtonTemplate を複製して選択肢をボタンとして生成できるようにします。
また、continue_dialogue.bind(value) とすることで、ボタンが押された際に Fiber に渡す値を予め設定するようにします。
func set_choices(choices: Dictionary = { 'Continue': null }) -> void:
	for child in %Buttons.get_children(): child.queue_free()
	for key in choices: add_choice(key, choices[key])


func add_choice(txt: String, value: Variant) -> void:
	var btn = %ButtonTemplate.duplicate()
	%Buttons.add_child(btn)
	btn.text = txt
	btn.pressed.connect(continue_dialogue.bind(value))
	btn.show()


func continue_dialogue(value) -> void:
	controller.perform('continue %s' % _value_for_rb(value))
	if controller.exception:
		printerr("controller: %s" % controller.exception)


func clear(all: bool = false) -> void:
	%Speaker.hide()
	%Content.text = ''
	set_choices()
	if all: %Buttons.hide()


func _value_for_rb(value: Variant) -> Variant:
	match typeof(value):
		TYPE_STRING_NAME: return ':%s' % value
		TYPE_STRING:      return '"%s"' % value
		TYPE_NIL:         return 'nil'
		_: return value


func _handle(key: StringName, payload: Variant) -> void:
	match key:
		&'says':
			speak(payload['name'], payload['content'], payload['face'])
			set_choices()
		&'asks':
			speak(payload['name'], payload['content'], payload['face'])
			set_choices(payload['choices'])
		&'finished': clear(true)
		_: print_debug('[%s] %s', [key, payload])
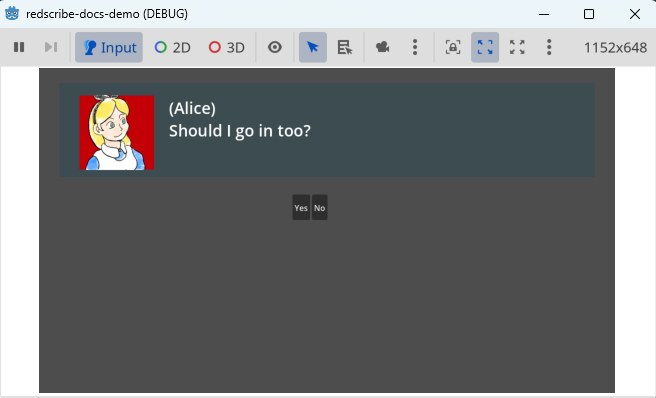
実行すると、選択肢が表示されるようになったと思います。
背景画像やBGMを変更する
これまで書いてきた内容で、会話ダイアログで以下ができるようになりました。
- 文字列を表示する
- 顔グラフィックを変更する
- 選択肢を表示する
上記に加えて、さらに背景画像やBGMを変更するなどの演出を付け足したい場合はどうしたらよいでしょうか。
シナリオを修正する(Ver. 4)
ここでは背景画像を変更するイメージで、場面転換するタイミングで scene :scene_name というメソッドで書けるようにしてみます。
require 'path/to/helper'
Dialogue.new do
  speakers %w(Narrator WhiteRabbit Alice)

  Narrator;
    says "Alice is resting in the field."
    says "Suddenly, she hears a panicked voice from afar."

  scene :riverbank

  WhiteRabbit; got :flustered
    says "I'm late, I'm late, I'm late!"

  Alice;
    says "Hi! Where are you going?"

  WhiteRabbit;
    says "I'm late, I'm late, for a very important date!"

  Alice; with :flustered
    says "Wait!"

  Narrator;
    says "Alice chased after the rabbit."
    says "But the rabbit disappeared into a burrow."

  scene :burrow

  Alice;
    says "He went in here."
    asks "Should I go in too?"
    unless ___?
      says "It looks so narrow and grimy... I really shouldn't."
      until ___?
        says "But I just can't stop wondering."
        asks "Maybe I should go in after all?"
      end
    end
    says "Alright, here goes!"

  Narrator;
    says "As Alice entered the burrow, the ground gave away and she fell down."
end
scene メソッドを実行すると、background シグナルを発行するように変更します。
class Dialogue
  class << self
    attr_accessor :current
  end

  attr_accessor :fiber, :last_value

  def initialize(&block)
    self.fiber = Fiber.new do
      yield
      Godot.emit_signal :finished, true
    end
    Dialogue.current = self
  end

  def continue(val = nil)
    fiber.resume(val)
  end

  def listen!
    self.last_value = Fiber.yield
  end

  def ___?
    last_value
  end

  def scene(sym)
    Godot.emit_signal :background, sym
  end
end
delegate Dialogue, :continue, :___?, :scene #
GDScript を修正する
実装は省略しますが、_handle メソッドを修正すれば背景画像を変更できるでしょう。
func _handle(key: StringName, payload: Variant) -> void:
	match key:
		&'says':
			speak(payload['name'], payload['content'], payload['face'])
			set_choices()
		&'asks':
			speak(payload['name'], payload['content'], payload['face'])
			set_choices(payload['choices'])
		&'background': print_debug("TODO [background] %s" % payload)
		&'finished': clear(true)
		_: print_debug('[%s] %s', [key, payload])
DSL を洗練する
会話ダイアログに表示する内容が長くなるにつれて、
says, asks, scene という今回作成した DSL 特有のキーワードがだんだんとノイズのように思えてきた人も多いと思います。
最初は、 (登場人物) says "(発言)" という形で、声に出して読める文章を書けるのがよいかと思いましたが、大事なのは登場人物と発言を書きやすいことです。
どうやったらノイズを削減できるでしょうか。
シナリオを修正する(Ver. 5)
演算子オーバーロードを使うことで、says, asks, scene を書かなくても済むようにしようと思います。
helper.rb に以下を追加してみましょう。
module SymbolExt
  def ~@
    scene self
  end
end
Symbol.prepend SymbolExt

module StringExt
  def -@
    says self
  end

  def !@
    asks self
  end
end
String.prepend StringExt
それぞれエイリアスを作成しました。
says "content"は、- "content"asks "content"は、! "content"scene :scene_nameは、~ :scene_name
これを使って書き直すと以下のようになります。
require 'path/to/helper'
Dialogue.new do
  speakers %w(Narrator WhiteRabbit Alice)

  Narrator;
  - "Alice is resting in the field."
  - "Suddenly, she hears a panicked voice from afar."

  ~ :riverbank

  WhiteRabbit; got :flustered
  - "I'm late, I'm late, I'm late!"
  Alice;
  - "Hi! Where are you going?"
  WhiteRabbit;
  - "I'm late, I'm late, for a very important date!"
  Alice; with :flustered
  - "Wait!"
  Narrator;
  - "Alice chased after the rabbit."
  - "But the rabbit disappeared into a burrow."

  ~ :burrow

  Alice;
  - "He went in here."
  ! "Should I go in too?"
  unless ___?
    - "It looks so narrow and grimy... I really shouldn't."
    until ___?
      - "But I just can't stop wondering."
      ! "Maybe I should go in after all?"
    end
  end
  - "Alright, here goes!"

  Narrator;
  - "As Alice entered the burrow, the ground gave way and she fell down."
end
どうでしょう。記号を使うことで、ぎゅっと詰めて書いても読めるようになりました。 もう、Ruby の面影はほとんど残っていません。まるで、会話ダイアログシステムに特化したプレーンテキストのような見た目をしています。
人によっては、初めてこれを見ても記号それぞれが何を意味するか、どのような動きをするのかわからないかもしれません。
ですが、世にある第3者が作成した会話ダイアログのライブラリと比較すると、自分で文法を定義できるという極めて強いメリットがあります。覚えにくい記法を覚える必要はありません。制御構文や変数を使うための特殊な埋め込み用の記法もありません。気に入らなければ自分の手に馴染むように変えればよいのです。
パーサを書く必要もなく、自分の好きな文法を定義できます。 きっと、あなたの作りたいゲームに合わせて柔軟に Ruby は応えてくれるでしょう。
今回作成したデモは https://github.com/tkmfujise/redscribe-docs-demo/tree/main/src/08.dialogue_refined から確認できます。
うまく動かせなかった方は、上記を参考にしてみてください。